Adding legends, logos and banners to Google Earth Desktop with Screen Overlays
Tutorial Contents
-
Prerequisites
-
Let's Get Started!
-
Adding a Screen Overlay
-
Changing the image
-
Changing the position
-
Discussion and Feedback
-
What's Next
Prerequisites
Basic KML code editing (or desire to learn!)
A text editing software such as Notepad, Notepad++, Text Edit or Text Mate
In April 2017, Google Earth on Web was released, which puts Earth on the browser. However, for this tutorial, you will need Earth for Desktop installed on your computer. Download the latest version here.
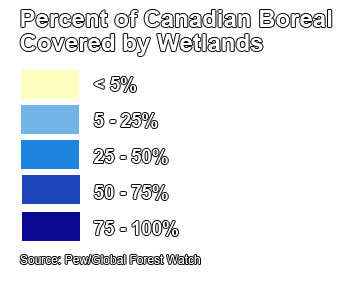
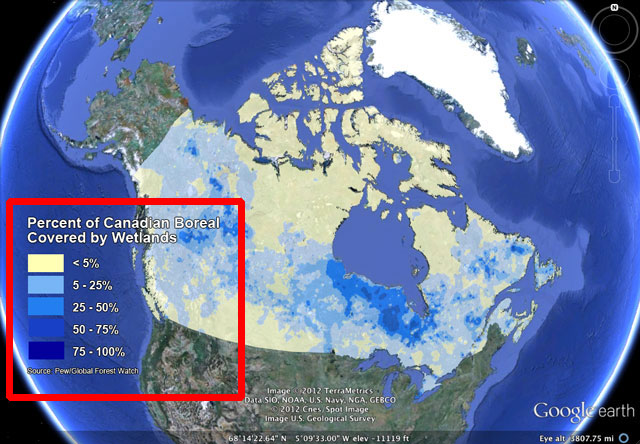
In this tutorial, we will use an example of The PEW Environment Group’s Boreal forest Google Earth layer, which you can download here and read about in this blog post. Once you open the KML, you’ll notice that it contains several data layers, each accompanied by a legend as well as logos. We will learn how to add the legend for the “Canada Wetland” layer pictured below to Google Earth.
In another tutorial, you learned how to add an image overlay to Google Earth. What are the differences between a screen overlay and a image (or ground) overlay?
Screen overlays are anchored relative to the screen. Image (ground) overlays are anchored relative to the ground.
Image (ground) overlays can be added with the toolbar button. Screen overlays are added in the KML code.
In the above examples, the legend and logos are screen overlays and the wetland map is a image (ground) overlay.
Let's Get Started!
Open Google Earth.
If you have already created an image file of a legend you would like to use, host it on a public site or save it on your desktop.
If you don’t have an image file, use our sample legend image file, which is hosted here. This legend image has been shared by The Pew Environment Group, and is for use for this tutorial only.

Download the sample starter KML (with data provided by The Pew Environment Group) to use during this tutorial, and open it in Google Earth (download here).
If you want to use your own project, you can open it in Google Earth.
Tips
Get creative with your own legend! You can create a legend in Adobe Photoshop or any other image editing software, or export a legend from ESRI ArcMap as a .jpg. Stick to image file types like .jpg, .png and .gif. If you want a transparent background to your legend, save it as a .png or .gif, as .jpg files do not support transparent backgrounds.
Alternatively, quickly make a legend using Google Earth Pro’s “Save Image” feature
. A customisable legend will be created using the features from the selected layer (please note, only the selected features from that layer will appear in your legend). Once you are satisfied with your legend it can be exported as an image file. Then crop the legend or take a screenshot to import it as a Screen Overlay.
Stick to image file types like .jpg, .png and .gif. If you want a transparent background to your legend, save it as a .png or .gif, as .jpg files do not support transparent backgrounds.
Adding a Screen Overlay
Once you have a KML open in Google Earth, open a text editor programme like Notepad, Text Edit or Text Mate.
Paste the following text into it:
 <ScreenOverlay>
     <name>
         Legend: Wetlands
     </name>
     <Icon>
       <href>YourURL.html</href>
     </Icon>
     <overlayXY x="0" y="0" xunits="fraction" yunits="fraction"/>
     <screenXY x="25" y="95" xunits="pixels" yunits="pixels"/>
     <rotationXY x="0.5" y="0.5" xunits="fraction" yunits="fraction"/>
     <size x="0" y="0" xunits="pixels" yunits="pixels"/>
 </ScreenOverlay>
This piece of KML code will add the Screen Overlay to your KML.
The Wetlands Legend image is hosted at the below URL:
https://sites.google.com/site/earthoutreachextfiles/file-cabinet/legend_wetlands.pngIn your text editor, copy and paste the image URL between the HTML tags to replace the text “YourURL.html”. Your KML code should now look like this:
<ScreenOverlay>
  <name>Legend: Wetlands</name>
  <Icon>
    <href>
      https://sites.google.com/site/earthoutreachextfiles/file-cabinet/legend_wetlands.png
    </href>
  </Icon>
  <overlayXY x="0" y="0" xunits="fraction" yunits="fraction"/>
  <screenXY x="25" y="95" xunits="pixels" yunits="pixels"/>
  <rotationXY x="0.5" y="0.5" xunits="fraction" yunits="fraction"/>
  <size x="0" y="0" xunits="pixels" yunits="pixels"/>
</ScreenOverlay>
Copy this text, then switch into your Google Earth window. Click on the KML folder for your project and hit paste.
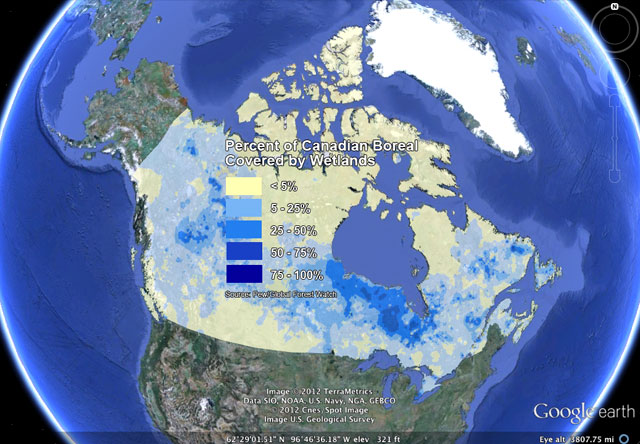
The screen overlay entitled “Legend: Wetlands” should appear in your Places Panel, as in the image below.

The screen overlay should appear on Google Earth, as in the image below.

Back in your text editor, you can make edits to change the name, the picture file it references, the placement on the screen and sizing. Or, if you’re happy with how it looks, you can click on the project folder and save as a KML/KMZ to package the legend with the KML layer.
Changing the image
To change to a different image, go back to the text editor. Replace the Icon URL with the URL of the new image you want to replace the existing image. If you’d like to replace the image with a file from your desktop, simply replace the url with the path to the file, for example:
For Mac users
<ScreenOverlay> <name>Legend: Wetlands</name>
  <Icon>
    <href>
      /Users/JohnSmith/Partners/Boreal/KML/files/legend_wetlands.png
    </href>
  </Icon>
  <overlayXY x="0" y="0" xunits="fraction" yunits="fraction"/>
  <screenXY x="25" y="95" xunits="pixels" yunits="pixels"/>
  <rotationXY x="0.5" y="0.5" xunits="fraction" yunits="fraction"/>
  <size x="0" y="0" xunits="pixels" yunits="pixels"/>
</ScreenOverlay>
For PC users
<ScreenOverlay> <name>Legend: Wetlands</name>
  <Icon>
    <href>
      C:\Projects\Partners\Boreal\KML\files\legend_wetlands.png
    </href>
  </Icon>
  <overlayXY x="0" y="0" xunits="fraction" yunits="fraction"/>
  <screenXY x="25" y="95" xunits="pixels" yunits="pixels"/>
  <rotationXY x="0.5" y="0.5" xunits="fraction" yunits="fraction"/>
  <size x="0" y="0" xunits="pixels" yunits="pixels"/>
</ScreenOverlay>
Copy this text, then switch back into your Google Earth window. Click on the KML folder for your project and paste the updated text. The screen overlay with your new image should appear on Google Earth.
You can change the title identifying your Screen Overlay in the Places Panel by editing the text between
<name></name>.
Changing the position
You can change the position of the legend in the Google Earth window by editing the
<overlayXY>and<screenXY>configurations in KML code. Let’s take a look at the current configurations:<overlayXY x="0" y="0" xunits="fraction" yunits="fraction"/> <screenXY x="25" y="95" xunits="pixels" yunits="pixels"/>The
<overlayXY>specifies a point on the overlay image that is mapped to the screen coordinate (<screenXY>).- It requires x and y values, and the units for those values.
- The x and y values can be specified with the following units:
- Pixels (“pixels”) which is the offset from the lower left corner of the image in pixels
- Fractions (“fraction”), meaning fractions of the image, which is the offset from the lower left corner of the image in fractions (from 0-1)
- The x and y positions can be specified in different ways—for example, x can be in pixels and y can be a fraction.
- The origin of the coordinate system is in the lower left corner of the image.
The
<screenXY>specifies a point relative to the screen origin that the overlay image is mapped to (from the<overlayXY>point on the image).- It requires x and y values, and the units for those values.
- The x and y values can be specified with the following units:
- Pixels (“pixels”) which is the offset from the lower left corner of the screen in pixels
- Fractions (“fraction”), meaning fractions of the screen, which is the offset from the lower left corner of the screen in fractions (from 0-1)
- The x and y positions can be specified in different ways — for example, x can be in pixels and y can be a fraction.
- The origin of the coordinate system is in the lower left corner of the screen.
Looking at the code sample again:
<overlayXY x="0" y="0" xunits="fraction" yunits="fraction"/>
<screenXY x="25" y="95" xunits="pixels" yunits="pixels"/>
The
<overlayXY>specifies that the point on the overlay image to be mapped to the screen is (0,0) – the lower left corner.The
<screenXY>specifies the place to which that point on overlay image should be mapped is 25 pixels on the x axis and 95 pixels on the y axis from the lower left screen corner.Let’s change the position of the Wetlands Legend to centre of the screen. Switch back to the text editor. Change the units for the
<overlayXY>and<screenXY>to fractions and map the centre point on the image to the centre point of the screen. After editing, your KML code should look like this:<ScreenOverlay> <name>Legend: Wetlands</name> <Icon> <href> https://sites.google.com/site/earthoutreachextfiles/file-cabinet/legend_wetlands.png </href> </Icon> <overlayXY x="0.5" y="0.5" xunits="fraction" yunits="fraction"/> <screenXY x="0.5" y="0.5" xunits="fraction" yunits="fraction"/> <rotationXY x="0.5" y="0.5" xunits="fraction" yunits="fraction"/> <size x="0" y="0" xunits="pixels" yunits="pixels"/> </ScreenOverlay>Copy the code in the text editor and switch back to Google Earth. Paste the code into your project folder. You can turn off or delete the previous legend you added. Now you should see the Wetlands Legend centred in the middle of the screen.

Screen Overlay Positioning Cheatsheet
To position your image in the centre of your Google Earth screen...
<overlayXY x="0.5" y="0.5" xunits="fraction" yunits="fraction"/>
<screenXY x="0.5" y="0.5" xunits="fraction" yunits="fraction"/>
To position your image in the upper left corner of your Google Earth screen...
<overlayXY x="0" y="1" xunits="fraction" yunits="fraction"/>
<screenXY x="0" y="1" xunits="fraction" yunits="fraction"/>
To position your image in the upper right corner of your Google Earth screen...
<overlayXY x="1" y="1" xunits="fraction" yunits="fraction"/>
<screenXY x="1" y="1" xunits="fraction" yunits="fraction"/>
To position your image in the lower right corner of your Google Earth screen...
<overlayXY x="1" y="0" xunits="fraction" yunits="fraction"/>
<screenXY x="1" y="0" xunits="fraction" yunits="fraction"/>
To position your image in the lower left corner of your Google Earth screen...
<overlayXY x="0" y="0" xunits="fraction" yunits="fraction"/>
<screenXY x="0" y="0" xunits="fraction" yunits="fraction"/>
Tips
To get familiar with changing the placement, sizing and rotation of a screen overlay, you can practise by downloading and experimenting with the KML Samples from the KML Reference Guide.
If you’d like to change the rotation or size of your image with KML code, check out the KML Reference Guide for tips on how to use the
<rotation>,<rotationXY>and<size>elements.PC users can download and use David Tryse's Screen Overlay tool.
Discussion and Feedback
Have questions about this tutorial? Want to give us some feedback? Visit the Google Earth Help Community to discuss it with others.
